In this tutorial you will learn the simple secrets of crafting a shoot sequence for HDR and creating professional quality HDR images in both Photomatix and Photoshop (depending on your weapon of choice). Not only will you learn an efficient workflow, but you’ll also learn the theory behind Dynamic Range. This lesson is taught by Peter Tellone, a professional photographer specializing in HDR landscapes.
1. Understanding High Dynamic Range (HDR) Photography
When we refer to Dynamic Range we talk about the difference between extremes. As it relates to photography and exposure we talk about the difference between the lightest part of the scene and the darkest parts.
Dynamic Range is expressed as a Ratio. So in that context, the human eye can see in a range of approximately 10,000:1. In comparison, a good digital camera can capture a scene with about 1,000:1. So, we can see that the eye is much more capable of viewing a range of brightness than a digital camera. Even more incredible is that a scene with both dark and light aspects–light as dim as room lighting, and Sun lighting in a window–can scale as high as a Dynamic Range of 100,000:1!
So, in conventional photography, we have to make compromises. We can expose for the highlights and get them without blowout, but the shadows will be dark and full of noise. Or, we could go the other way and expose for the shadows, but then we would blow out the highlights and lose all detail.
We could use a split Neutral Density filter, and half of the image would be one exposure and the other half would be 2 or 3 stops less depending on the filter. But that would only work with the straight line of a horizon. What if you were shooting an odd-shaped mountain or an open doorway? There is no way to put these shots in a standard photographic filter.
But if we were to make an image that exposed for every area “just right” we could expand the dynamic range of our camera to make it comparable to what our eyes can see and beyond. That is what High Dynamic Range Photography is all about.
Before we begin, let me make one thing clear that people often get confused about. We are going to use High Dynamic Range Photography but our end result is going to be a Low Dynamic Range image (and all current HDR images are really Low Dynamic Range images). As things stand now, no printer or computer display is capable of displaying a truly High Dynamic Range image.
2. How do I shoot a HDR Photograph?
A High Dynamic Range Image is composed of 3 to 7 of the same image at different exposures. Each image is at perfect exposure for every level of brightness in a scene. How we adjust the exposures is critical. If we kept the shutter speed constant and adjusted the aperture, this would give us varying Depths of Field–an unwanted characteristic. We want all the shots to look the same, only varying in exposure. We could vary the ISO, but higher ISOs add more noise and we want as noise-free an image as possible. Since HDR is an additive process any noise will be multiplied. So that leaves us with one choice: Shutter Speed.
To begin setting up your HDR photo shoot, set your camera on a sturdy tripod. This will ensure each image in the sequence is exactly the same. Set your ISO for the lowest noise and set your aperture for f16.
Yes, you could use wider apertures, but in my images I want detail, since capturing extreme detail is the reason we take HDR images. We want that detail to go as far into the field as possible, so that is why “I” suggest f16. YOU, don’t have to. This is one of the many artistic choices you can make when it comes to HDR.
As far as varying the Shutter Speed, we have two choices. We can set our camera to AV mode and use the Auto Bracketing feature most cameras have. Most Canons are limited to 3 exposures at the interval we choose (+ – 2EV Max). Certain Nikon models allow for greater numbers of auto shots and a wider spread of EVs (Exposure Values).
I recommend a wholly manual approach. I find it allows for a faster process, as I don’t have to go through any menus to set it up and will have more options at my disposal if I want to make a last minute change to how many exposures I will shoot, and at what intervals. But that choice is up to you.
3. What type of images do you use for HDR?
A HDR image is a 32-Bit image. This means that the image is capable of an infinite number of different tones and brightness levels. We need to produce the best images possible that will leave us with as much information as is possible. Since no camera shoots with 32-bits we must make do with the options available to us. This means shooting RAW or Tiff images, as these formats are both capable of 16-Bit which, while not infinite, gives us about 64,000 different levels of information.
Can we use JPEGs? You can, but since JPEGs are only 8-Bit they are only capable of 255 different levels of information. While they are not optimum at all, they can be used in a pinch.
4. How many exposures will I need and how far apart should they be?
In most cases 3 exposures are all that is necessary and 2 stops or 2 EV apart is sufficient. If you have the sun in the shot or bright sunlight you should use more. I like to shoot at least 5 shots and have them only 1 stop apart but I am going for a more realistic look, which may or may not be what you want from your image.
Now that we have our equipment set up correctly we are going to take our 3 shots. The first one will be with your meter centered for a good average metered shot. For your second shot, we will dial back the shutter speed until the meter reads -2, then we will take our next shot with a meter reading of +2. If you use the Auto Bracketing feature of your camera, this will be done automatically for you.
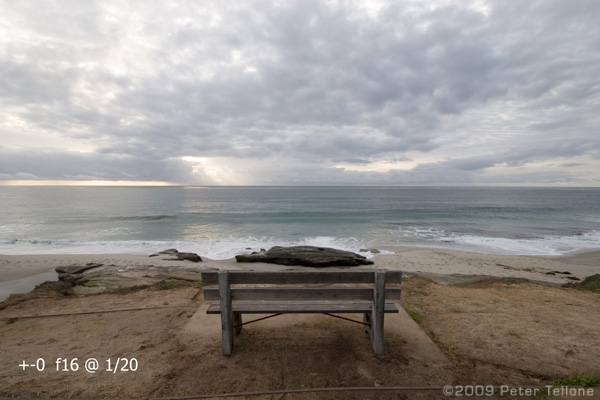
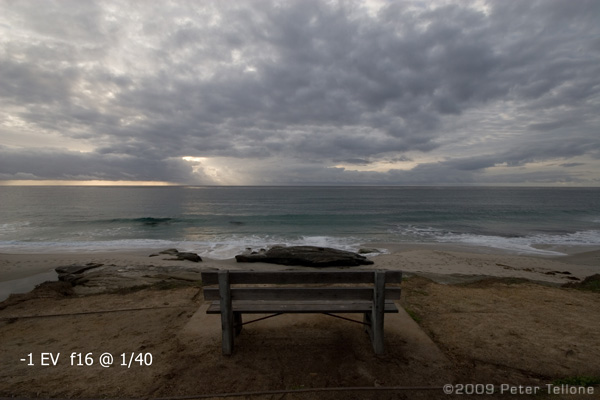
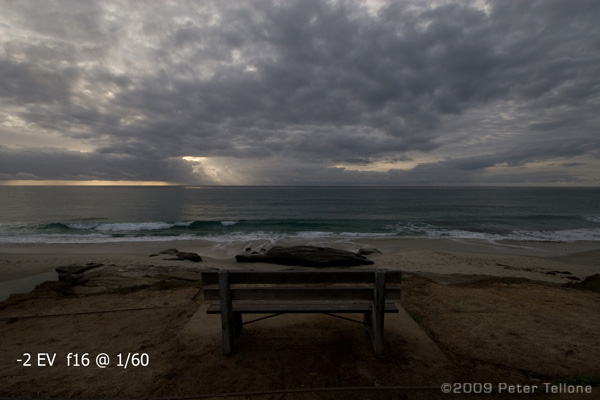
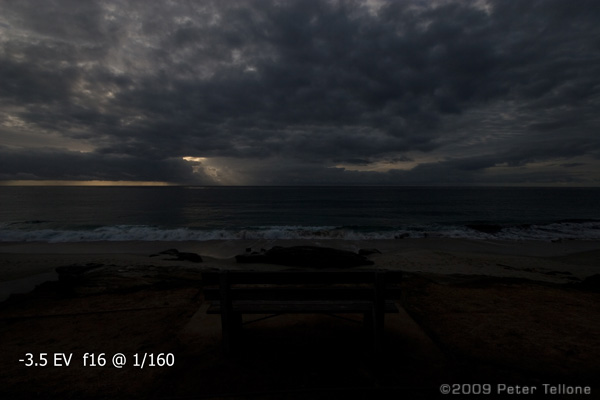
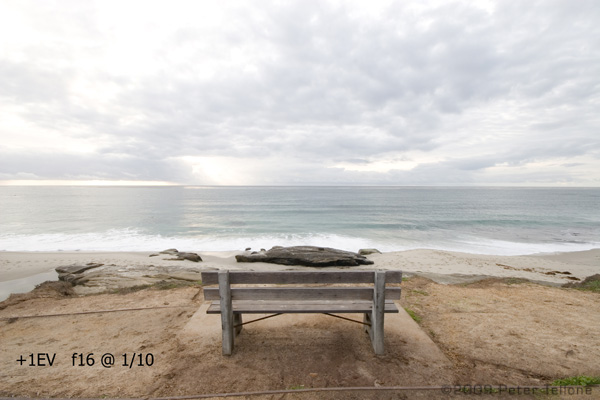
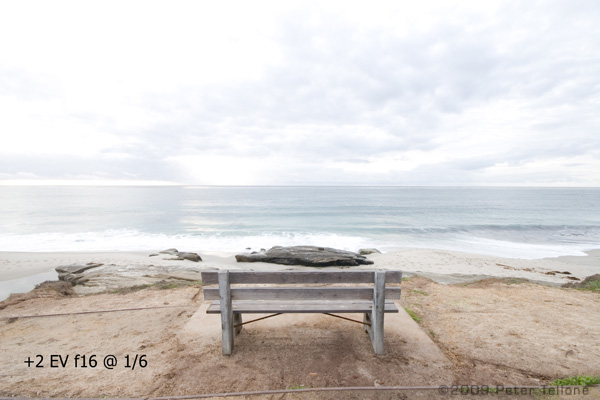
In my own shoots, I start at 0 Meter and that is my first shot, then I do one at -1, -2 and then (if I have sun in the image) I also bang one hard at -4 because I want to make sure that I have no blow-out in the brightest part of the image. Unfortunately, there is no meter reading for -4 so I need to figure out what that would be. The good thing is that since we are using Shutter Speed it is quite easy to figure out, as opposed to aperture which is Logarithmic. If my -2 exposure was 1/50, I multiply x2 (1 stop) and then again x2 (1 more stop) and I get 1/200th of a second and I set my exposure at that. After that I take one shot at +1 and one at +2. Rarely will you have to go beyond that on the + side, since +2 normally exposes shadows quite well.
Below are some examples of a Shoot Pattern. The first shot is what your shot would look like if you did not use HDR photography.
5. Taking it to the Computer!
Now you have your exposures. If you find later you don’t need that many, you can use just the 0, -2 and +2 images for you HDR image.
Now it is time to go to your computer, download your images and get ready to process your image into a HDR photo.
I will show you two methods. One, using Photomatix, the HDR software from HDRsoft. It’s relatively inexpensive software and is the industry’s most popular. But if you don’t want to spend any extra money and want to use something you may already be familiar with, I will show you how to use Photoshop–provided you have version CS2 or above.
6. Processing your HDR image in Photomatix Pro
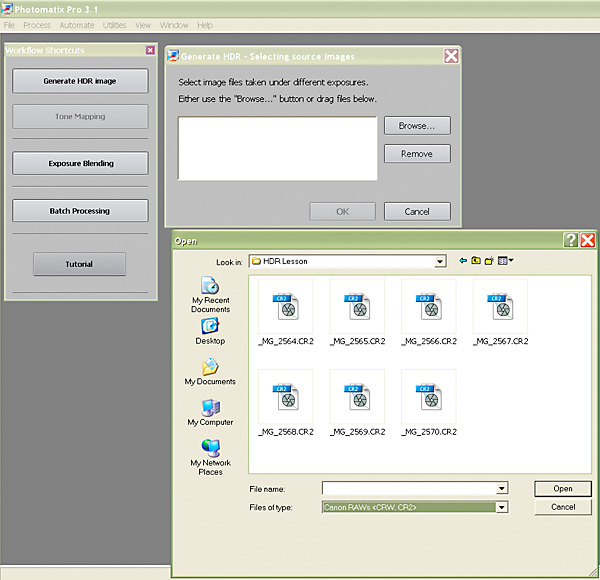
Open Photomatix and you will see a Shortcut box. Click on ‘Generate HDR Image’. This will open up a ‘Select Images’ window and from that you can browse to the folder location of your images. Select them, click ‘Open’ and ‘OK’.
This will bring up a new Dialog Box which you will fill in to tell Photomatix how you want your HDR image processed.
Step 1
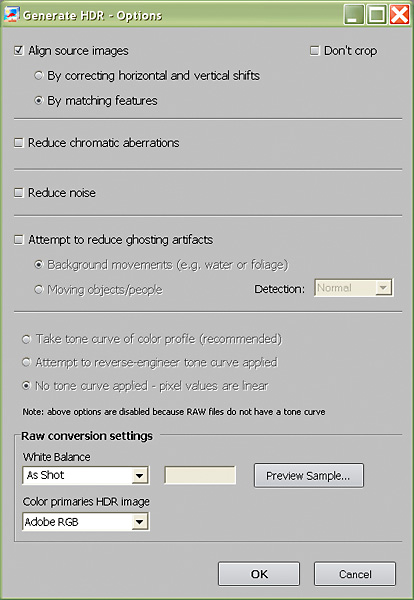
The first section is for aligning the multiple images. Often it is best to select ‘Match Features’. This will keep all the features in the image aligned and prevent movement at the edges of objects. The other option is to match vertical and horizontal shifts. Only try that if you have no luck with ‘Match Features’.
The next two boxes, ‘Correct Chromatic Aberrations’ and ‘Reduce Noise’ I prefer not to use. If the images need this, I will process the RAW image into 16-Bit TIFF images and make the corrections in a program better suited to this.
The next section is ‘Attempt to Reduce Ghosting Artifacts’, which can be very useful if you do have some moving objects in your image, such as a swaying tree, people or ocean waves. If you have nothing moving, it is best to leave this un-checked as you will get a sharper image overall.
The rest of the options are rather self-explanatory and will rarely need your attention. I use Adobe RGB as my Color Space because of the wider gamut, but you may use sRGB with excellent results.
Click ‘OK’ on this panel.
Step 2
Photomatix will now process your RAW Files into a true 32-Bit HDR Image. This may takes a few minutes depending on your computer’s speed.
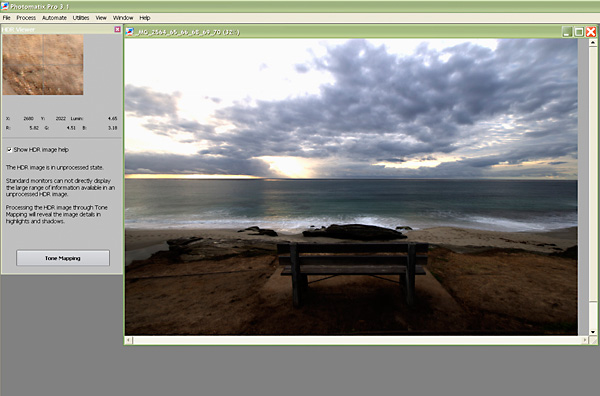
The result is your first HDR Image. Looks pretty bad huh? This is because your monitor is unable to display a 32-Bit HDR image. We have to take the next step and ‘Tone Map’ the image into a Low Dynamic Range that is capable of being displayed and printed.
Step 3
Save your HDR image as either a Radiance RGBE HDR image or an Open EXR HDR image. There are some minor differences, but it really doesn’t matter for our uses, so take your pick!
Next, click on ‘Tone mapping’ and we will transform the image until it looks exactly how we want it to.
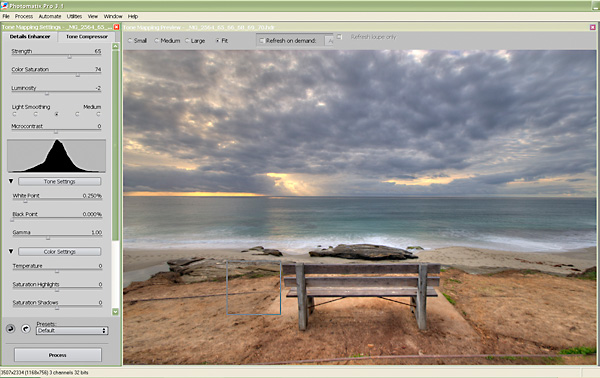
The Photomatix ‘Tone Mapping’ screen is set up sort of like Lightroom, in that the features you use are displayed in order of use from the top down. That is where we will start, except for one thing. Photomatix remembers the last setting you used and will display these when you open tone mapping. To start with a clean slate, go down to the bottom of the panel, drop-down the preset list and choose ‘Default’. Now we are at a good starting point.
Step 4
At the top of the panel you will see two tabs. One for ‘Detail Enhancer’ and one for ‘Tone Compressor’. ‘Detail Enhancer’ does as it suggests and gives you a very detailed HDR image that can run from Wild to Mild. The other choice is ‘Tone Compressor’; this yields a more realistic photographic look for your image. While this can be helpful and just what you want for some images, we don’t need these features for this tutorial.
In the top area we have controls for Strength, Color Saturation, Luminosity, Light smoothing and Micro Contrast. If you hover your mouse over any of these controls they explain their general use.
The first two we are going to work with are Strength and Light Smoothing. I generally scale strength up to 100 (but rarely leave it there) and then move Light Smoothing back and forth until I get the overall look that I want, that is: good overall light to dark, no halos (unnatural light around objects) or ghosting (remnants left by moving objects) and an image that looks correct top to bottom in Lightness. If you can’t find the combination you want, try leaving the light smoothing at a point that looks the best and then lower the strength until you find a combination you like.
High Light Smoothing is generally more realistic while Low light smoothing creates an image that looks more computer generated. There is no right or wrong here. It is all in getting what YOU want from the image. If you have too much haloing the cause is usually too much Strength for the Light Smoothing you are using. If you have too much graying of whites or blue skies, you have too much Light Smoothing in the image. Adjust these back and forth until you get the balance you want. At this point the image may look quite flat. You don’t need to get your pop from this step, it will come later.
Next we look at Color Saturation. Again, this is to taste, but I run mine up to about 70. You can adjust the luminosity control to modify the overall brightness of the image. The ‘Micro Contrast’ setting controls any haloing you may get around objects that are dark against light in the image.

Step 5
Now we have the general look that we want, it’s time to add some punch and drama to the image.
Since HDRs even out brightness throughout the image, they tend not to have a lot of contrast. This is natural, but to give the image the impact we want I like to add some contrast back into the image. We do this with the next three sets of control: White point, Black point and Gamma. White point controls the highlights, Black Point controls the shadows and Gamma controls the Midtone. I like to start with Gamma first and then tweak the other controls only if necessary. I move the Gamma Control to the left to Increase Midtone Contrast.
Now you have your mostly finished Tone Mapped Low Dynamic Range Image. Check over the image for any small flaws that could be corrected with the rest of the controls.
Note: You can change the overall Color temperature of the image if you see that it is not quite the correct White Balance. You can selectively increase or decrease saturation in the highlights or shadows alone.
In the next section you can work on other fine points. If you see too much noise in an open sky you can adjust the Micro-Smoothing. If your highlights or shadows need some more work, you can also apply some more smoothing to them locally instead of globally as the other light smoothing control does. Once you have your image the way you want it, you are mostly done. But first, if you want to save the settings on your controls for use on another image, click the Preset button and save your settings with a name you will remember.
Step 6
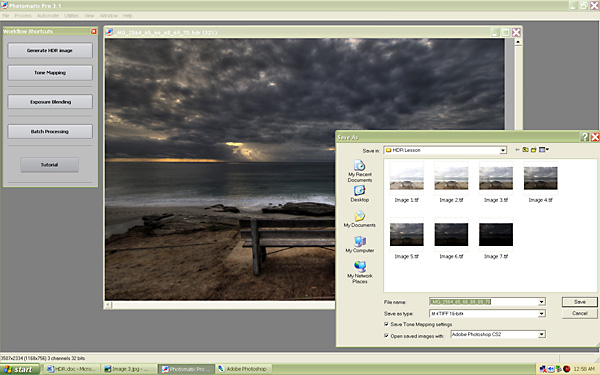
Now we tackle post-processing. Click the ‘Process Image’ button and it will apply your settings to the HDR image. Once the processing is done, you can now save your image. I prefer to keep all the information, so I save it as a 16-Bit Tiff, but it is possible to save as a JPEG if you prefer that format. The nice thing about the save panel in Photomatix is that it allows you to send your saved image directly into Photoshop for any final work you would like to apply. I always choose this option as I feel the image is not complete without some final tweaks in Photoshop. I usually set some overall levels, and then sharpen or reduce noise as necessary in the image. I also like to Dodge and Burn smaller areas to get them right.
Once that is done you may re-save the image as a Tiff or save it as a JPEG for printing at your Print Lab of choice.
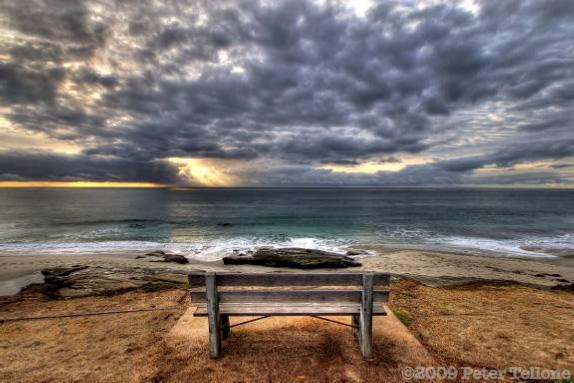
7. The Final Image
8. Processing your HDR Image in Photoshop CS2, CS3 or CS4
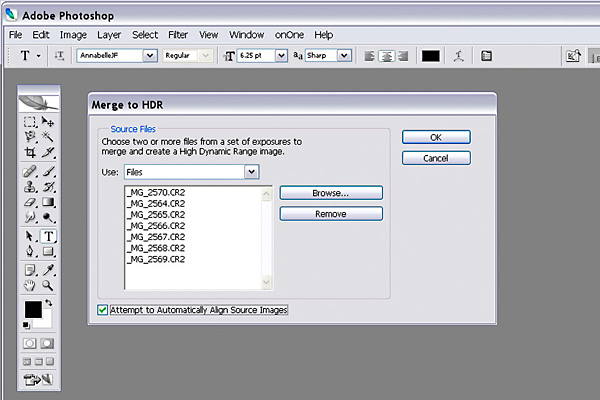
To open the images in Photoshop and merge them to HDR, we will go to File > Automate > Merge to HDR.
We will choose our RAW or 16-Bit Tiff images to merge to HDR. Click the box for ‘Attempt to Automatically Align Source Images’. Note that with some images from high Megapixel cameras and the already large tax that Photoshop places on a system, this may be beyond your computer’s ability to achieve. If you get a warning, try again but
make sure to un-check the align images box.
Select ‘OK’ and Photoshop will go to work.
Step 1
A new screen will pop up. If at this point we wanted to save the 32-bit HDR image we would just click ‘OK’ and save as a ‘Radiance HDR’ file. But since we want to get straight into Tone Mapping we will drop down the ‘Bit Depth’ list to ’16 Bit/Channel’ and select ‘OK’.
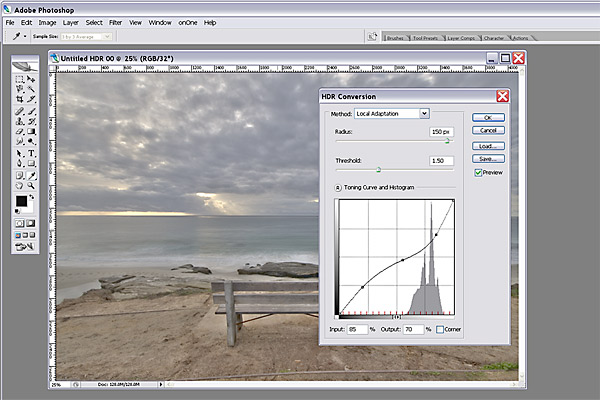
Photoshop will begin the merging process and when it is done it will open a new Dialog box called ‘HDR conversion’. Select ‘Local Adaptation’ from the drop-down menu, then click the down-arrow to expand the dialog window to include the ‘Toning Curve’ and ‘Histogram’.
Here is where Photoshop and Photomatix differ. In Photomatix, everything is done through the ‘Tone Mapping’ process. In Photoshop, Tone Mapping is much more limited but you will finesse the image using all the regular Photoshop tools you are used to: Levels, Curves, Hue and Saturation, etc.
Your controls are ‘Radius’ and ‘Threshold’ plus ‘Toning Curve’. A good starting point for the Radius is about 150 and the Threshold is 1.50. Adjust these back and forth until you get all the tones across the image fairly even. Allow time for the image to refresh in-between adjustments or you may find yourself over-shooting your marks. Don’t be surprised if the image looks very flat and lifeless at this point, as we will bring it back to life in the next step.
Now use the Toning curve to bring more specific areas of the image into line with your artistic vision. If you want to find the point in the curve for an area you want to work on, move your cursor over the image and it will change to the Eye Dropper tool. Hover it over the area and click on it. You will see exatly where that tone is on the curve line and you can then adjust that area up or down by dragging the curve.
Step 2
Once you have the image even in tone, click ‘OK’ and we can begin to liven up the image and add some contrast.
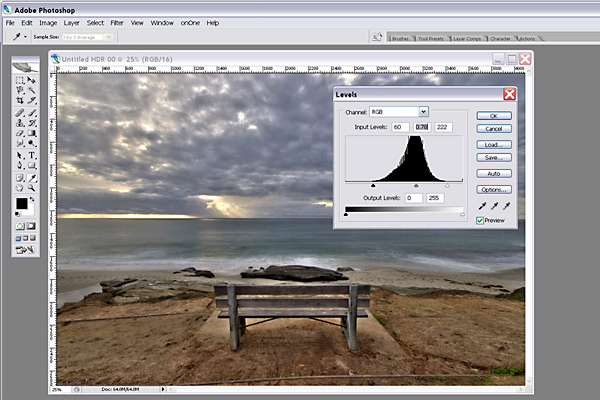
I usually like to start with Level, but you may use Curves if that is your tool of choice. In this image I brought both the Highlight and Shadow sliders towards the center to bring back both my white and black points. As you do this you will see the image pop back into to life.
Step 3
From here I will usually adjust the saturation to my liking, then I may either use some noise reduction or sharpening depending on what the image needs. I also like to dodge and burn any small area that was not able to be controlled with the broad strokes of the adjustment sliders.
Once you have tweaked everything to your liking, save it in the file type of your choice. Be aware that if saving as a JPG you will need to change the mode from 16-Bit to 8-Bit (Image > Mode > 8-Bit) before that option is available in the ‘Save As…’ box.
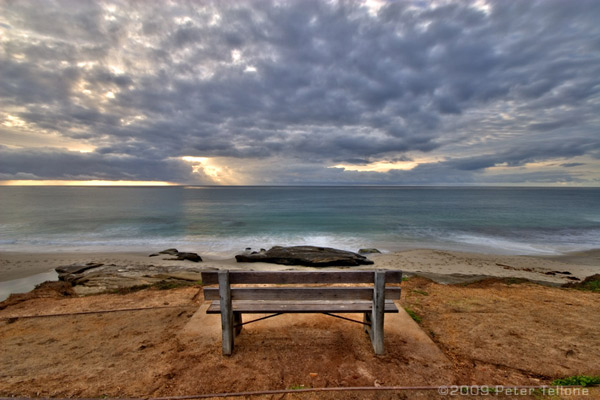
Here is a final image using Photoshop.
9. Final Thoughts
Both Photomatix and Photoshop are great ways to process your HDR images. Photomatix is program more specifically geared to HD and it allows for a wider range of final image effects, from mild to quite wild (that ‘CGI’ look). Photoshop is a little more limited but still very capable, though less capable of producing the ‘Wild HDR’ look, which in some cases… is a good thing! Photomatix is also a lighter program on your computer’s resources and usually processes image quicker that Photoshop, but that will ultimately depend on your particular system and its memory.
I’ve covered all the basics to get you started shooting and producing HDR photos, but there is much more you can learn and explore… if you want to. It is your art and your vision and there is no one way or look that is correct. Play and enjoy. I think the one thing I enjoy most about this process is that I never know what I have until the end of the process when it all comes together. I can’t see it in the LCD even if I do have an idea in my mind. I guess it’s kind of like the days of the darkroom where you never knew what you really captured on film until you slipped the paper into the solution and saw what developed. I hope you enjoy this process as much as I do.

